Saturday, July 13, 2013

Update!

To make a very long story extremely short, I have bees again! And boy, do I ever! This post is going to be long, really more for documenting this journey than for just enjoyable reading, but here goes!

Some time ago, a couple of years in fact, I tried to build a bee swarm trap. I was successful at building it, but unsuccessful at catching a swarm. When I lost the only colony that I owned, it kind of took the wind out of my sails, but I really did enjoy trying to raise bees and they were so fascinating to watch and learn about. In the back of my mind, I wanted to try again, but it seemed that timing was everything and ordering bees was kind of tricky and expensive and I was struggling with what to do. About 7 months ago, I called Dadant to put my name on the list for a nuc of honey bees. Dadant is the company that I purchased my first colony from two years ago and I thought that I would go ahead and do that again. That idea was quickly squashed when I was told that they don't offer nuc service anymore. My other options were to order a package of bees or try to find a friendly, local beekeeper that would sell me one of his young colonies. Both options are expensive and not really something I wanted to do.
 
I then decided to consider swarm trapping once
 again. The website from which I learned about swarm trapping in the first place is a wonderful site to learn about beekeeping and the guy's videos are very informative and I felt like connected to what he was saying. I learned that he had written a book about catching swarms and so I purchased it. The book really doesn't say much more than what was in his videos, but I enjoyed reading it and I learned a lot about swarms and bees in general.  I learned that swarm season in Texas starts about the middle to late March and that traps needed to be placed during that time. By the time I found out this information, it was already close to March and I needed to build my traps and decide where to place them and pretty quickly. I already had one that I built a year earlier and I decided that I would build 3 more for a total of 4 traps. I had been on a frugality kick lately, so I thought I would try to build them out of scrap wood or anything I might find cheap or free. I ended up deciding on used wooden fence planks I got from a friend who was repairing some of his fence. For a beginner, 4 traps is pretty good I guess, but I have heard of people having 20 traps that they place all over. I had become resolved to the fact that since
this was my first official year and without having very many traps to improve my chances, I would be okay not catching a swarm. This was going to be a year of learning.


Once the traps were built and ready to deploy, I needed to find a place to put them. I really didn't want to put them too far from home, but I needed to place them in different locations. A neighbor of ours, down the
Swarm trap in back yard
hill toward the highway had a yard sale one weekend. I went to the sale and started talking with the gentleman about different things and I found out that he owned acreage across the  highway. It's a large field that's primarily used for hay. Along the back side of the field is a tree line and creek that runs the entire width of the field. Thinking about the book I read, I knew that a good location for a trap is at the edge of a forest or tree line next to a field. I also thought that the creek would also be a good place. I didn't read that in the book, however. I asked the man if he would allow me to place a few traps at the edge of the field. He said that was fine as long as I would give him some honey. I chuckled and said I would be glad to, but I really didn't have much hope. I really was not wanting to set myself up for disappointment.

Trap by creek's edge
Well the days passed and life happened. I really don't remember the exact day that I put the traps out, but I know that it was way passed the middle of March. And I think it was closer to the end of April, maybe even May. That's why I should keep this blog updated. I would be about to know for future reference. Anyway, it was late and I knew my chances were not very good. I placed one trap on a nice sturdy tree about 6 feet from the ground. It was about 10 feet or so from the fields edge and out of view. It was also about 20 feet from the creek. I hung it, baited it and left. I placed another trap probably about 300 yards away along the same meandering tree line and not far from the creek. I also placed this trap about 6 feet off the ground. I then placed a third trap on a tree in my backyard.  I know that's only 3 of the 4 traps. I just never got around to hanging the other trap. So then I waited. I checked the traps about once a week and nothing had changed. In fact, one of the traps close to the creek had become a home for a bunch of roaches and rollie pollies. We had had some rain, and the fence boards that made up the trap had soaked in a lot of moisture and the bugs loved it. I had to kick out the unwanted bugs several times. I thought that if I was a bee, I wouldn't want to live there.

Then, during the week leading up to Memorial Day, I walked down to check the traps by the creek. I came to the first trap and to my surprise, I saw bees coming and going from the trap. I couldn't believe it! It's hard
Bees in trap
to explain the kind of feeling I had when I saw those bees. I immediately realized that if nothing else happened, then this year would be a success! I almost skipped to the next trap, not really caring that it would probably be empty. the next trap indeed was empty except for useless bugs that had yet again moved in. I dumped them out and re-hung the trap. I went home at a more happy pace and tried to figure out what to do next.


Sunday, February 10, 2013

Rendering Lard

Not too long ago, I began a quest for the perfect biscuit. I think some people say, that biscuits are the easiest bread to make and they are probably right. But I think that there is somewhat of an art to making biscuits. There is just something about that light flaky texture that sets it apart from other breads. And when it's done right, you just know it. My daughter says that my biscuits don't need anything on them so in my mind, I guess they are pretty good.

I always make my own biscuit mix and until now, I have used shortening for the fat content. After all, that's what gives biscuits that flaky texture. Then I found out that you can make your own lard, by rendering down pig fat. I have heard that lard makes the best baked goods including pie crusts and biscuits. Lard is available in a plastic tub off the shelf from my local grocery store, but everything I have read says that if you don't have to refrigerate it, it's no good. It is filled with preservatives and other oils. So I began looking for pig fat and quickly found out that it's not that easy to find. Just recently, I discovered a slaughter house about 30 minutes away and spoke with a really nice gentleman who made me a deal.

This is 1/3 of the total fat I received. He actually gave it to me in a frozen state, and I let it thaw in the fridge for a couple of days. I didn't weigh it, but it's probably close to two pounds.


 This is after cutting it up. It's best to cut it into small pieces because it will render more liquid. This is the hardest part, because you need a really sharp knife to cut it. Some people are able to get the butcher to run it through the grinder for them. That's probably a really good idea, but I didn't know to ask at the time and it was frozen so I didn't want to trouble anyone. One good thing about cutting it myself is that I was able to discard of any remnants of meat that may have been left. If you render the meat along with the fat, it may tend to add some flavor to the lard and it might not be good for pastries or bread. If you are just going to use it for frying or adding to savory dishes, a little meat is probably fine to leave in.


The fat cannot burn while it's rendering. That will also add flavor and I don't want that. The best way is to cook it slooooow. I decided to use this electric skillet. Since it has a thermostat, I don't have to worry about it getting too hot. I also added about 1 cup of water before adding the fat. This kept the fat from heating too quickly and potentially burning at the start. I really wasn't sure at what temperature to set, so I averaged around 225 degrees. I think this worked pretty well, because it did cook very slowly. Maybe too slow, I'm not sure.


This is the fat at the beginning in the water.


This is after about 90 minutes of cooking. One thing for sure is that you have to have some time to do this. It's very time consuming.

This was after about 3 hours. It looks a little like cooked onion. Now it's time to drain.


 I decided to use small jars, a canning funnel, a fine metal sieve and a couple of sheets of cheese cloth. I simply tipped the skillet and spooned the fat and liquid into the jars. Even though the fat was not completely  finished, I collected the liquid. Once the fat drained, I returned it to continue melting. I will then use that liquid for frying and flavoring. The longer the fat cooks the more flavor it adds to the rendered lard.

This is what I got from the first pour. It's a really beautiful golden color. I'm not sure how much this is, but I think it's about 3 cups so far.

This jar is from the second pour, about 90 minutes later. You can see it is a little darker in color than the previous two. This one will probably have a little pork taste to it. It's probably fine for baking, but I may use this in flavoring beans and maybe frying an egg or two.

This was the final product of the "cracklins" or fat that did not render. I really don't think that they were completely finished, but I was on a schedule and needed to quit. It just didn't seem like they wanted to give up anymore liquid. I decided that I may have been a little too careful not allowing them to burn. I probably could bump up the temp to 275 and be okay. Maybe on my next batch, I will try that.

But, I would say the job was a success. These are the three jars completely cooled. The one on the right is just a little darker than the other two. This is probably about 4 cups of lard.

Final thoughts: This is a long process. I will do it again and you really don't have to babysit too much. Is it worth it? I think so. After spending so much time on it though, these are really more valuable in my mind than you average can of Crisco. If the saying "time is money" is true, then these are really expensive. I will try them in my next batch of biscuits and that will really tell me whether they were worth the effort.


Presto 06852 16-Inch Electric Skillet with Glass Cover


Friday, January 25, 2013

Update on estate sale find

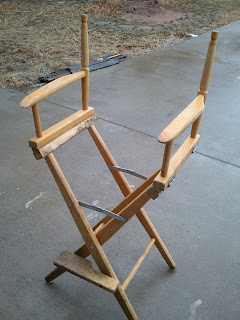
Well, what do you know, another post. And it hasn't been a year since the last one. Maybe I'm on to something. One of the things that I hope to do is complete some jobs that I start and one of those was to redo the director chair that I obtained from an estate sale. It was in the last post. Here is the picture again.


At that same estate sale, my daughter saw a brand new seat and back replacement for a chair such as this. I can only assume that it was meant to be used for this actual chair. Anyway, I decided I would paint the chair and make it look nicer than it was, then use the replacement seat and back. Here is how it turned out.


The chair really came out nice, I think. The total price ended up being about $2. This style of chair sells on the internet for around $120 so I think we made out good. I don't plan on selling it yet, but if one of my readers really likes the PINK fabric, let me know. I will make you a deal. By the way, did I mention it was PINK!

Saturday, January 12, 2013

Amazing What You Might Find

Who am I kidding? Updating my blog is like going on vacation. It happens once a year and it's fun. Actually, every time I post, I say to myself, "self, I'm going to update more frequently this time!" There I said it again. Honestly, I have lots of things I can post. It's just that it takes me a while to figure out what to write and I'm somewhat of a perfectionist and if it doesn't look just right, I get frustrated and blah, blah, blah.

Anywho, here we are again with another long after due post and this time I thought about doing something kind of weird that I have never seen before. I enjoy going to garage and estate sales and from time to time, I think I actually get really good deals on things that I can't possibly live without. So I decided that I wanted to share my finds with the world. I know you really can't wait to see all the treasures, so here goes.

I found a good estate sale today. In fact, it was so good, I'm really thinking about going back tomorrow when they will have everything 25% off! This was close to Lake Texoma and it was the estate of a deceased couple that I have decided I would have really liked to know. They seemed to take an interest in everything that I like from gardening and cooking to bee keeping and just general outdoor puttering. They had lots of books on birds and other wildlife from Texas and many tools and cooking toys. They have several out buildings, a few were in bad shape with treasures untold inside.

Anyway, following is a couple of items I found.
 I found this pith helmet right before I walked out the door and almost missed it. It is a beekeepers hat and it works perfectly with my netting that I have. As you can see, it was $2.00. This helmet is in excellent shape and appears to have been worn seldom.

We have needed some additional coffee spoons for quite some time. Even though only two of these match, I wanted to get them. There is nothing special about them and I don't really shop for spoons very often. I got all four for $1. I'm not sure that's a good deal or not, but I'm happy.


This directors chair was not really on my list, but I found it in one of the out buildings. My daughter had already found a brand new replacement seat and back for it that she was going to purchase for a chair at church that needed it. So when I saw the chair, I had to get it. Don't have a specific price on this because it was bundled with several other items. I will let you know of the total cost of the items in a moment. The chair has some mildew in areas because of it's location close to the elements, but the wood seems to be in good shape. I think the plan is to clean and paint it.


This is an excellent shovel, perfect for turning compost or cleaning chicken droppings from the coop. Again, this was bundled, so can't be specific on the price.


This was a REAL find in my opinion. Four bee supers and queen excluder. The excluder is to keep the queen from going places within the hive where you don't want her to go. There is some rusty areas on the excluder and I don't know what effect that will have on the bees. The supers are in good shape but pretty dirty. I will scrape those down and paint and they will be good as new. Again, bundled.

Now, for the above 3 items, I was able to score all of them for just $6!! That's right, $6.

If for nothing else, if I can just keep this kind of posting up, I know that I, myself will enjoy looking back at the wondrous items that I find from time to time and remember the deals and the neat people that I get to meet. I hope you enjoyed this.

See you next year!!

Hopefully, just kidding.